Sunday, March 17, 2013

Spring has sprung!


My baby sister is turning 22 this upcoming Wednesday, March 20th! Which is also the first day of Spring! In honor of this Spring baby, I made her a Spring flower arrangement. I haven't had the opportunity to work with certain Spring flowers and wanted to give it a try! I used a cute mixing bowl as the container because it's nice to give flowers in something more creative then just a vase. I also used floral foam to make her arrangement because it helps space the flowers and hold them in place.

The finished product!

I used light pink spray roses, white and yellow ranunculus, and eucalyptus from Trader Joe's and white hydrangea and purple tulips from Whole Foods market. After soaking the floral foam and positioning the foam in the container I placed the focal flowers first which were the hydrangea. They take up a lot of room in the arrangement which helps you use less of the other flowers. Then, I placed the spray roses, ranunculus, tulips, and eucalyptus until you could no longer see the floral foam through the stems.
Close up of the flowers


 The hydrangea, roses, and eucalyptus were the easiest to position in the floral foam. Ranunculus are very, very soft stemmed and difficult to work with, when pushing them into the floral foam the stems tend to snap in half. the tulips were also harder to get into the floral foam because they have thick fleshy stems.
Chip helping transport

Sissy and her flowers
Cute mixing bowl

Perfect for a Spring table!
I am starting to branch out and do wedding flowers for people other than just close friends and family. This should be a fun adventure and I feel blessed to have such a great support team! Having beautiful wedding flowers is a must, and having them be affordable is also a must! Not everyone can spend thousands on their wedding flowers and honestly you don't need to! I look forward to my next wedding flower project coming up in April!

Saturday, December 22, 2012

Making a Hydrangea and Rose bouquet

So, when I did my wedding flowers the idea of this little blog had not even popped into my head. I never took pictures of the step by step process of how I made my bouquets. Lucky for me, my awesome friend Kellsie allowed me to do her wedding flowers and I made sure to get step by step pictures of making her bouquet with hydrangea and roses, and her bridesmaids bouquets with roses and italian ruskus. Both of these bouquets are so easy to make it seems silly to pay a florist hundreds or even thousands of dollars to make them! Get your girls together and have them all pitch in and help make your wedding flower dreams come true! Making these bouquets takes two people. One person to build the bouquet and then one person to help tie it off.

Our bucket of Eskimo White Roses.
A bucket of white Hydrangea from Whole Foods.

Step One

Step One
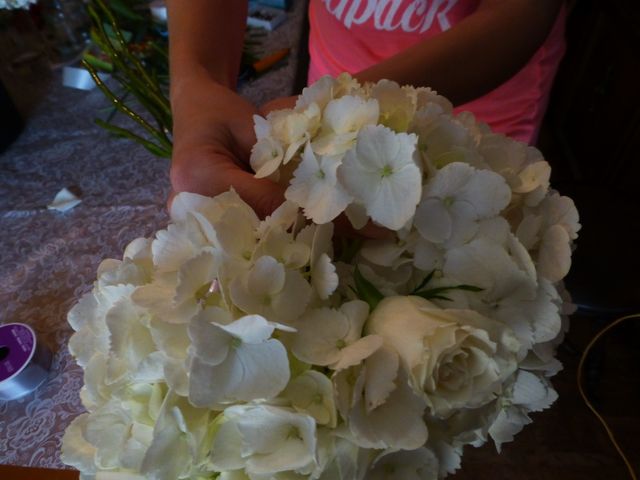
I wanted this bouquet to be bold and solid white, so I started by cutting all of the leaves off of the Hydrangea. Make sure you always use special flower cutting scissors or pruners that are made for working with flowers. Some hydrangea flowers are very full and round, others are more oval shaped or more loose. When making a mixed bouquet with flowers other then Hydrangea make sure you use the looser of the flowers so you can easily mix the Roses in with the large Hydrangea flowers.

Step Two
 Start with your base flower, one with a very strong stem. I used a Hydrangea for mine, added some roses around it, then added another Hydrangea, then more roses to finish it off.

Step Three
 Don't be afraid to pull the Hydrangea apart and put Roses in the middle. You can even snip out parts of the Hydrangea to get more of a loose shape that is easier to work with then a dense round ball.

Step Four
Make sure you check how the bouquet looks from the side as well as the top. You want a nice round shape from the top and you want the flowers to be even all the way around. This picture had too much hanging down on one side so I just snipped some of the individual Hydrangea flowers out.

The top view of the bouquet, nice and round.
Step Five

 This is where your teammate comes in! Professional florists use wire or floral tape to make bouquets. I used transparent duct tape. Why you ask? Because it is easy to work with, it holds the flowers tightly, and it is cheap. Once you duct tape the flowers by the top and a few inches down you then cover the duct tape with satin ribbon and you can't even tell!

Almost finished.
Once you wrap the bouquet with ribbon, trim the ends of the flowers so they are all the same length and put it in a mason jar with just a little bit of water so it doesn't get the ribbon wet but the flowers can still drink.


Step Six
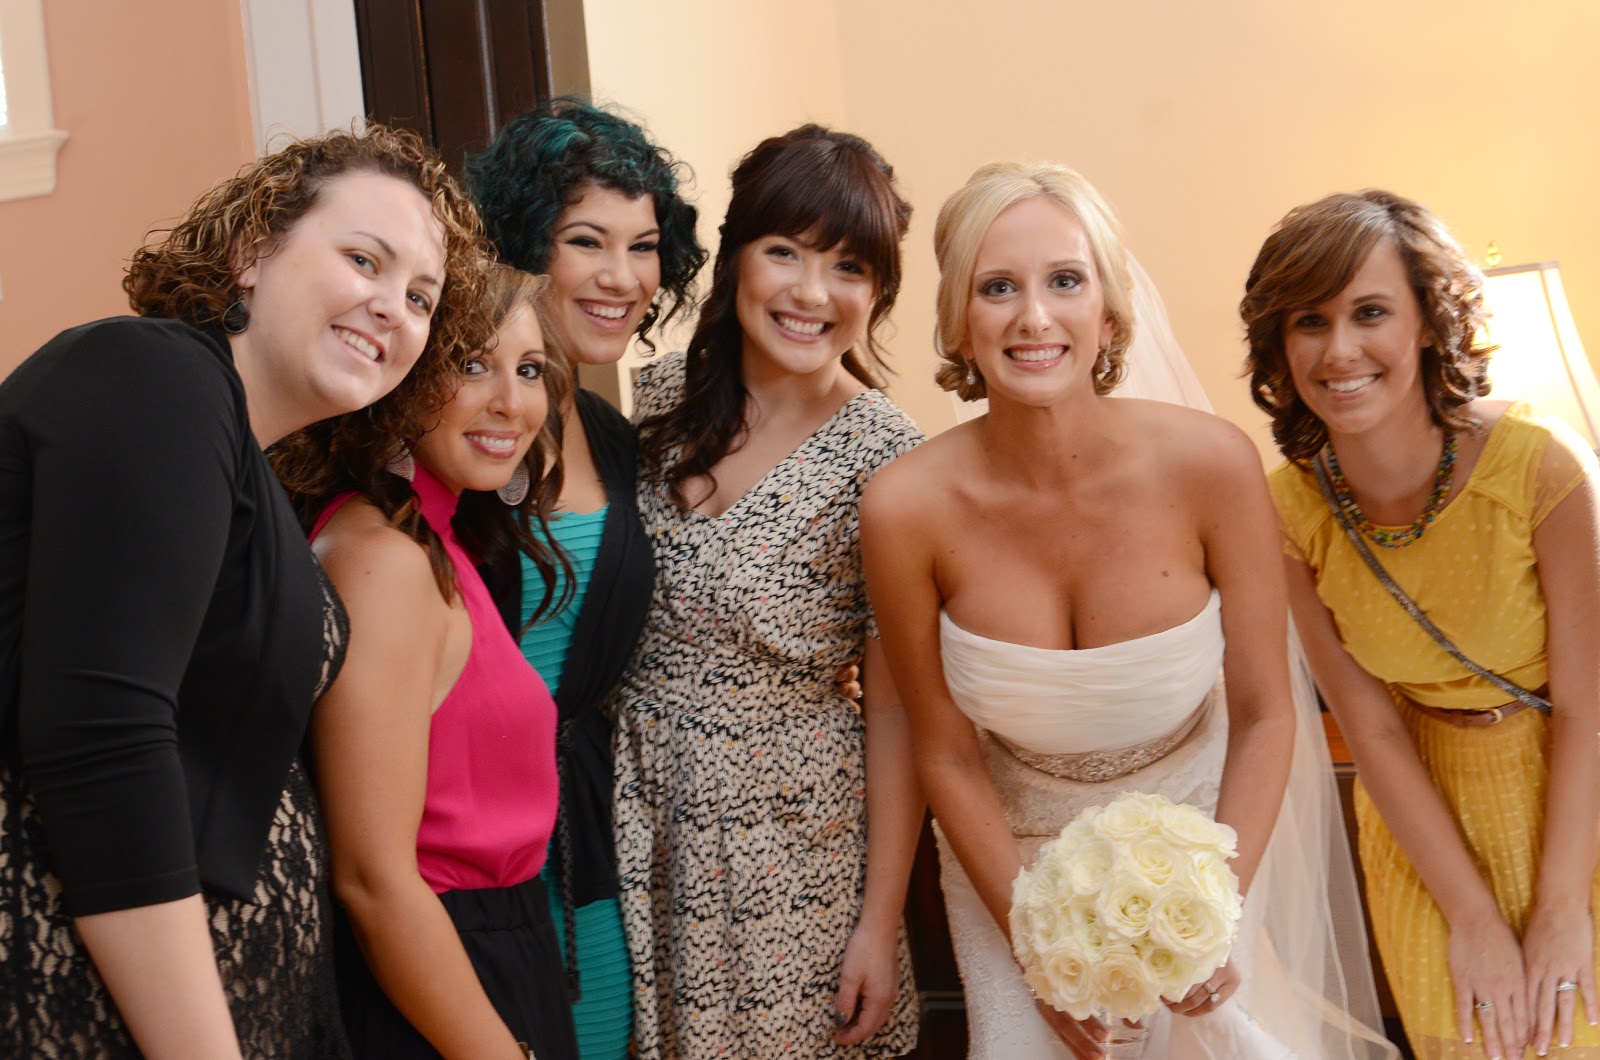
 Marry your best friend!! Kellsie was an awesome bride and she trusted me 110%! She even allowed me to make her bouquet a surprise that I gave to her when she was in her dress and ready to go! Being part of their day was so special and I will never forget it!

Thank you for reading!

Love, Anna


Wednesday, December 19, 2012

How to make a carnation ball


 My beautiful friend Kellsie got married on December 9th to the love of her life and they are one amazing and talented couple! I pretty much begged Kellsie to let me do her flowers for free, she just needed to order the flowers. She used bloomsbythebox.com just like I did and yet again the flowers were amazing! Her vision was to have red carnation balls on top of milk glass goblets. When she showed me pictures of the dense flower arrangements I was super intimidated and worried that I couldn't pull it off. We practiced one time with store bought carnations and that made me feel confident enough to do it for her wedding. Yes, one practice round and I knew I could pull it off...that is how easy these awesome looking arrangements are!


Oasis Floral Foam Balls


We used 6 inch diameter oasis floral foam balls from a local craft store. We soaked them in warm water for about 30 minutes before we placed them on top of the milk glass goblets. You can find these balls in several sizes and you can also find floral foam in a lot of different shapes like cone, cube, or cylinder.


Prep your flowers!

Start an assembly line and have a few people prepping the flowers. Cut the stem at a sharp angle about an inch past the base of the flower. This will have the flower about two inches higher then the ball. 

Cutting at a sharp angle.
 Always be sure to use scissors that are made for cutting flowers or pruning. Regular scissors aren't sharp enough and crush the stem of the flower, preventing it from absorbing water properly.

Always start at the top in the center.

 The best way I can describe my technique without having a video is to say that I made one row all of the way around the ball, and then made the rest of the rows in a triangle or diamond pattern so that it was completely filled in with flowers.

Keep adding flowers row by row.
Add caption
Use your fingers to make sure when you push the next flower in it doesn't mess up the other flowers petals.
Every few minutes take a step back and make sure the entire arrangement looks even.

Finished product, working on the first row of my 2nd arrangement.


All six arrangements ready to go!
 Be warned that the arrangements will be very top heavy so be sure to travel with care!

One awesome thing about these arrangements is how affordable they are! I used around 50 flowers per arrangement and depending on the size of the ball you can use a lot less. You can also do this same technique with other flowers such as roses but, carnations are the least expensive. Anyone can make these and there are so many color choices with carnations the options are endless! 


Thank you for reading, more to come!!

Love, Anna


Tuesday, December 18, 2012

After wedding hair!

Wild after wedding hair!!

Cupcake (lighter) and Cherrybomb mixed with conditioner!

I promised a coworker that she could do something wild to my hair after the wedding! We decided on light pink to hot pink ombré tips! I love working at a salon!!!

Brian actually likes it!
 More blog posts about flowers and such coming soon!!!

Love, Anna


Friday, November 30, 2012

More getting ready photos

My dress hanging in my mom's dressing room.   

Dress close up.


My dress hanging in my mom's living room.

Kristin (hair) and Aubrey (makeup)
False lashes are a must for your wedding day!


My awesome sister in law!

My beautiful and newly engaged MOH

My sister looked stunning!
Girls dresses, I should have had matching hangers!


My pride and joy of the day! I made this!

Old, new, borrowed, blue!

Something old, something blue, something borrowed, something blue. What does it all mean? This should help explain! Here are the items I used for my "somethings" and some other ideas as well!

Something old & something blue
I used a handkerchief that was a gift from my Aunt as my something old and something blue. I wrapped it around my bouquet to have in case I cried at all during the wedding. Some other good ideas for something old would be a antique broach to pin to your bouquet, a piece of fabric from your mother or close family members wedding dress or veil wrapped around your bouquet or sew a button from your fathers wedding day tuxedo or suit into the lining of your wedding dress out of sight! Something blue can be a challenge but I have seen some interesting ideas lately. Get a blue Hair Dreams hair extension put into your hair and blended into your updo (this one is not for the conservative bride), cute light blue bridal panties from Victoria's Secret, blue shoes can also be a good way to incorporate blue into your wedding day attire!

My something borrowed.


I think the best thing to borrow for your wedding day is jewelery. I am lucky enough to have a super awesome maid of honor who let me use her diamond bracelet as her something borrowed. My photographer snapped this amazing picture of her putting it on for me before I put on my dress. Does your mom, grandmother or other close family member have a pretty pair of earrings or a bracelet that you always complement? Tell them how special it would be to get to wear it on your wedding day! Or, do you have a friend that recently got married and purchased new wedding jewelery? Ask them if they would mind loaning you a necklace or even a hair comb. If no body offers, don't be afraid to ask! Chances are anyone that loves you would be honored to have you wear something of theirs at your wedding. 

Something new

There are an endless supply of something new ideas, I could have counted my dress, earrings, undies, veil, or perfume. I also had beautiful new grey satin Michael Kors pumps, so why not make them my official "something"?! Most people count their dress as something new but I challenge you to buy something new that you can use again after the wedding! I will use my wedding earrings again, also my shoes, undies and perfume! I feel special every time I use something from my wedding day and it brings back wonderful memories! I also got ties for my groom and his groomsmen so they could all wear them again! The first time my husband wore his wedding day tie to work he got a complement!


Thanks for reading, more to come!

Love, Anna

Hair and Makeup

I am blessed to work at a wonderful full service salon with a group of crazy talented women! Their wedding gift to me was doing my bridal parties hair and makeup. Let me just say that I have never felt so beautiful in my entire life! I know that that isn't the case for most brides, so here are some tips for saving money on hair and makeup.


Jane Iredale bb cream and urban decay eye shadow.

1. Travel to the salon instead of having hair and makeup artists come to you. A lot of times there is a traveling fee when stylists have to be on location, this is normally around $100.00 but could be even more.

My MOH being awesome yet again by painting my sisters nails at the last minute!

2. If you don't mind your bridesmaids not having updos, then just getting a shampoo and style with a flat iron or curling iron can be half the price of your average "updo".

Nina getting her hair done, her makeup looked amazing!

3. Try and look like yourself! So many brides get so over done on their wedding day that they don't end up looking like their usual self. I am normally a hair down type of girl but I really wanted to wear my hair up because I felt like it looked more bridal. But, if you don't normally wear heavy eye makeup or red lipstick then DO NOT DO IT!! Not only will your new husband be in shock, but your pictures last forever and you don't want to look like a different person in them. 

I used my favorite lip gloss, Peony by Revlon. It is inexpensive and not sticky!

4. Use good makeup that will last all night. I used Jane Iredale makeup which is also what I use every day. It will not move if there are tears or sweat! You can always go into a salon that sells Jane Iredale and get a lesson on how to apply it yourself. My salon charges $35.00 for a Jane makeup application.


I am just going to put this out there: my hair was AMAZING!!!! Kristin has mad skills.


Other fun wedding beauty tid bits: I used three layers of bubble bath OPI gel polish to get a little more of a pink look on my nails. I layered two colors of OPI polish on my toes (strawberry margarita on the bottom, princesses rule on top) so I basically had a one of a kind wedding color that I can replicate and I just think that's fun!

Aubrey making me pretty! She did my base makeup in the natural sunlight so it was perfect!

 **I also bought a new perfume that I had never worn before (Flowerbomb) to wear on my wedding day, so now anytime I smell the scent I am taken right back to the aisle. It is amazing! I also got a new scent to take on my honeymoon but it went missing after it went through customs (sad face). 

The amazing girls that did our hair and makeup!!!


Thank you for reading, more to come!

Love, Anna